Basic Taping and Wrapping Techniques Associated with the Wrist and Fingers
While completing activities of daily living, as well as athletic activities, the wrist usually requires it normal range of motion and stability to complete most activities. Acute and chronic injuries of the wrist include: contusions, sprains, injuries to the TFCC, fractures, dislocations, ganglion cysts, overuse injuries and conditions. These injuries may occur due to an excessive range of motion, compressive forces placed on the joint, falling on an outstretched hand, repetitive stresses, or shearing forces. Similar to the wrist, the hand, fingers, and thumb are essential in completing daily activities and participating in athletic activities. In regards to the hand, fingers, and thumb, shear forces, compressive forces, and excessive ranges of motion often times result in bony and soft tissue injuries including: contusions, sprains, dislocations, fractures, tendon ruptures, and blisters.
Taping for a Wrist Sprain (Figure-of-Eight)
The Purpose: The purpose of applying tape to a wrist sprain is to provide the joint with stability by decreasing the range of motion. This type of wrist taping may contribute to the treatment and prevention of wrist injuries including contusions, sprains, TFCC injuries, fractures, and or dislocations.
The Materials: Materials that may be used within this taping technique include Tough Skin, a self-adherent tape (pre-wrap or Powerflex), and 1 inch white athletic tape.
The Preparation: In preparation for this taping technique, the athlete should be positioned in a standing or seated position with the wrist in a neutral position with the fingers abducted.
The Application:
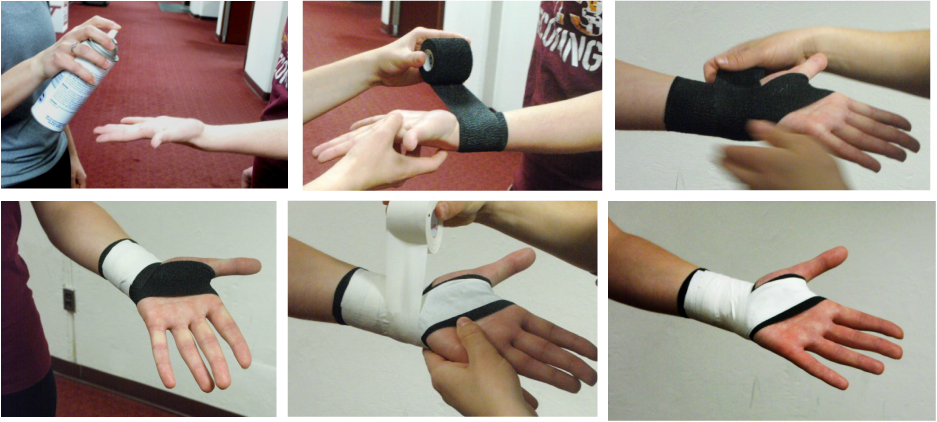
- Place the athlete in the proper positioning.
- Unless the athlete states not to, then spray the wrist and hand with Tough Skin. Next, apply the self-adherent tape, for the purpose of this instructional program, PowerFlex will be used as the self-adherent tape.
- Use the PowerFlex apply anchors that start just below the ulnar styloid process and encircle the wrist in a lateral to medial direction with moderate roll tension. The tape should be applied proximal to distal, should overlap by half, should not have any gaps or major wrinkles.
- Once the tape has reacted the base of the styloid process and the carple bones, proceed to pull the tape in a medial direction over the dorsum of the hand (the back side of the hand), continue to pull the tape over the thenar web space (the space between your thumb and index finger), then cross over the palm of the hand pulling in a distal and lateral direction. The tape should remain proximal to the metacarpophalangeal joints.
- Next, continue from the fifth metacarpal over the back side of the hand to the distal radius around the wrist, and return to the ulnar styloid process with moderate tension roll.
- Repeat the figure-of-eight pattern 1-2 more times, overlapping by 1/3, avoid wrinkles and gaps within the tape, as this may lead to blisters.
- Once all of the figure-of-eight strips have been completed, use the 1 inch white athletic tape to apply an anchor around the base of the wrist.
- Once completed, ask the athlete how the tape feels, making sure it is not too tight or causing any friction on the skin.
Demonstration:
http://youtu.be/j-tmE4FE5R0
Wrapping for the Hand and Wrist (Figure-of-Eight)
The Purpose: The purpose of applying an elastic wrap to the hand is wrist is to provide compression for swelling and mild support by limiting the range of motion. This technique can be used when preventing and treating contusions, sprains, TFCC injuries, fractures, dislocations, and over use injuries.
The Materials: Materials that may be used to complete this wrapping technique includes a 2, 3, or 4 inch in width and a 5 yard in length elastic wrap. To secure the wrap, metal clips, velcro, or self-adherent tape can be used to anchor the end of the wrap.
The Preparation: In preparation for this taping technique, the athlete should be positioned in a standing or seated position with the wrist in a neutral position with the fingers abducted.
The Application:
- To start, anchor the elastic wrap directly to the skin on the unlar styloid process. Next, pull the wrap across the back side of the hand, then over the thenar web space, and back down to the ulnar styloid process.
- Complete a circular anchor pattern around the wrist, moving medial to lateral, distal to proximal, overlapping by half.
- To create additional support, a seconf figure-of-eight pattern may be included after the anchors.
- When the wrap has reached the end, apply either velcro, metal clips, or self-adherent tape to the wrap to create an anchor.
- Be sure to ask the athlete how the wrap feels, making sure that it is not too tight

Demonstration:
http://youtu.be/zEKuO14tpb4
Buddy Taping for the Fingers
The Purpose: The purpose of buddy taping is to provide mild to moderate support of fingers suffering from collateral ligament injuries, sprains, postdislocations, subluxations, and post fractures. It is important to remember that the injured finger should be taped to largest adjacent finger for support.
The Materials: Materials that may be used to complete buddy taping include Tough Skin and 1/2 inch white athletic tape.
The Preparation: In preparation for this taping technique, the athlete should be in a standing or seated position with the wrist, hand, and fingers in a neutral position.
The Application:
- Unless stated otherwise by the athlete, spray the Tough Skin on the two fingers which will be buddy taped.
- Apply the 1/2 inch white tape at the proximal end of the two fingers, creating a circular anchor. The tape should encircle to fingers between the MCP and the PIP joint.
- Apply the 1/2 inch white tape at the distal end of the two fingers, creating a circular anchor. The tape should encircle the fingers between the PIP joint and the DIP joint.
- To ensure stability, 1-2 more anchors can be applied to each location.
- To ensure comfort for the athlete, it is optional to place a 1/8 inch foam or felt pad between the fingers prior to taping.
- Be sure to ask the athlete how the tape feels, making sure that it is not too tight.

Demonstration:
http://youtu.be/DvB0pwfs5Kc
Taping for the Thumb
The Purpose: The purpose of taping a thumb spica is to provide mild to moderate support with the goal of limiting excessive range of motion for the MCP joint. This taping technique can be used in the treatment and prevention of thumb sprains, postdislocations, and postfractures.
The Materials: Materials that may be used to complete a thumb spica include Tough Skin, 2 inch PowerFlex, 1 inch and 1/2 inch white athletic tape.
The Preparation: In preparation for this taping technique, the athlete should be in a standing or seated position with the hand and thumb in a neutral position.
The Application:
- Unless stated otherwise by the athlete, spray the Tough Skin on the injured thumb, the base MCP joint, and the base of the wrist.
- Apply the 2 inch PowerFlex tape just above the radial styloid process of the wrist. Pulling lateral to medial, create two circular anchors around the wrist moving proximal to distal. Then, pull the tape from the lateral side of the wrist, covering the back side of the hand, pull towards the thumb.
- Next, pull the tape on the lateral side of the MCP joint up towards the index finger, and wrap the tape between the thenar web space. Circle the thumb with the tape and then pull it down moving towards the ulnar side of the wrist.
- Next, using the 1/2 inch white athletic tape, follow the same patter as described in step 3. Complete this step 3 times with the white tape, creating support of the lateral side of the MCP joint. The tape should overlap slightly on the MCP joint.
- Using 1 inch white athletic tape, create an anchor around the wrist, covering any end strips of the tape.
- Be sure to ask the athlete how the tape feels, making sure that it is not too tight.

Demonstration:
http://youtu.be/FoKVvi3Bvp0
http://youtu.be/FoKVvi3Bvp0
