Basic Taping and Wrapping Techniques Associated with the Shoulder and Elbow
The anatomical structure of the shoulder does not provide the joint with a great stability. The anatomical structure provides the shoulder with a considerable amount of range of motion. With the available range of motion and the lack of stability provided by the bony, ligamentous, and tendinous structures of the shoulder, this joint is at risk for both acute and chronic injuries. While completing activities of daily living, as well as athletic activities, acute and chronic should and upper arm injuries may result from direct and indirect compression forces, excessive range of motion, as well as repetitive stress associated with overhead motions. Common injures that may occur within the should include: contusions, sprains, dislocations/subluxations, fractures, strains, ruptures, and overuse injuries and conditions such as impingement and bursitis. Within the elbow acute and chronic injuries and conditions are often times a result of a direct force, excessive range of motion, and repetitive stresses that overload the joint. Common injuries that may occur within the elbow include: contusions, sprains, strains, ruptures, dislocations, fractures, bursitis, abrasions, and overuse injuries and conditions.
Compression Wrap for the Shoulder
The Purpose: The purpose of applying a compression wrap to a shoulder joint is most commonly to provide support and stability to an unstable shoulder. A shoulder spica helps to prevent excessive abduction and external rotation of the shoulder. Another reason for applying an elastic wrap to a should is to provide support and anchors for protective pads that should be worn when treating and preventing shoulder pointers and AC joint sprains.
The Materials: Materials that may be used within this wrapping technique include a 4 inch or 6 inch width by 10 yard length elastic wrap, 2 inch Power Flex, and 1.5 inch white athletic tape.
The Preparation: In preparation for this taping technique, the athlete should be positioned in a standing position with shoulder placed in internal rotation. This position is accomplished by asking the athlete to place their hand of the involved side on or behind their hip.
The Application:
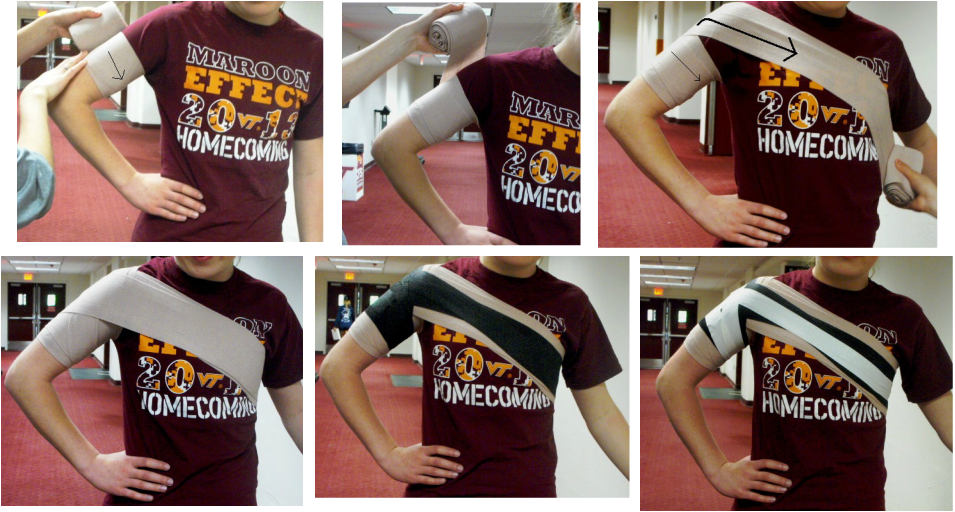
- Place the athlete in the proper positioning.
- Anchor the end of the elastic wrap on the mid to proximal arm on lateral side of the involved arm. Proceed to pull the wrap around the upper arm in a medial direction to encircle the anchor.
- At the posterior side of the upper arm, continue to pull the wrap up and over the should in a medial direction. The wrap should cross directly over the AC joint. Continue to pull the wrap across the chest, under the axilla of the non-involved side, then across the upper back, back to the anterior aspect of the should. The wrap should again cross over the AC joint, be pulled under the axilla of the injured shoulder, and then encircle the upper arm.
- Using moderate tension, follow this circular patter 2-3 more times, overlapping by half.
- Once the elastic wrap has reached the end, anchor the wrap with 2 inch Power Flex and 1.5 inch white athletic tape. Apply the tape over as an anchor on the proximal shoulder, follow the same medial pattern across the shoulder involved should, across the chest, under the non-involved axilla, across upper back, and back over the AC joint of the injured shoulder. Apply white athletic tape using the same pattern.
- Once completed, ask the athlete how the compression wrap feels, making sure that it is not too tight.
Demonstration:
http://youtu.be/h0xQ3qRJvqs
Taping for Lateral Epicondylitis
The Purpose: The purpose of applying a lateral epicondylitis strap to an elbow is to help treat the pain associated with lateral epiconylitis. The strap reduces the tension or pull of the wrist extensor musculature, which originates on the lateral epicondyle of the humerus. Lateral epicondylitis straps can be made from a variety of taping materials and can be purchased off of the shelf.
The Materials: For the purpose of this taping technique, the materials that may be used include a 1 inch Elastikon, 1 inch white athletic tape, and scissors.
The Preparation: In preparation for this taping technique, the athlete can be sitting or standing, as long as the involved elbow is slightly flexed and the forearm is placed into a neutral position.
The Application:
- Place the athlete in the proper positioning.
- First, palpate the lateral epicondyle of the humerus. About 3/4 of an inch distal to the lateral epicondyle is where the Elastikon anchor should start.
- Anchor the Elastikon strip directly to the skin on the lateral side of the elbow. Continue to apply moderate roll tension around the forearm in a circular motion, moving in a lateral to medial pattern. Return the tape to the original starting point.
- To add additional support, you may apply 2-3 more circular patterns of the Elastikon tape. Another way to apply additional support is to take the 1 inch white athletic tape and follow the same circular pattern around the forearm 1-2 times.
- Once completed, ask the athlete how the tape feels, making sure that it is not too tight.

Demonstration:
http://youtu.be/TvLtIXfAzrU
Taping for a Hyperextended Elbow
The Purpose: The purpose of applying tape to a hyperextended elbow is to help treat the pain and limit the range of motion of the injured elbow. By doing this, it limits the hyperextension of the elbow and the stretch that may be placed on the surrounding soft tissue.
The Materials: Materials that may be used within this wrapping technique include pre-wrap, lubricated heel and lace pads, 2 inch Elastikon, Tough Skin spray, 2 inch Power Flex, and 1.5 inch white athletic tape.
The Preparation: In preparation for this taping technique, the athlete should be in a standing or seated position with the injured elbow flexed with the hand and forearm in a supine position. First, place the athlete in a pain free range of motion. To do this, passively move the elbow into extension until the athlete begins to feel pain. Passively move the athlete back into the flexed position that was pain free.
The Application:
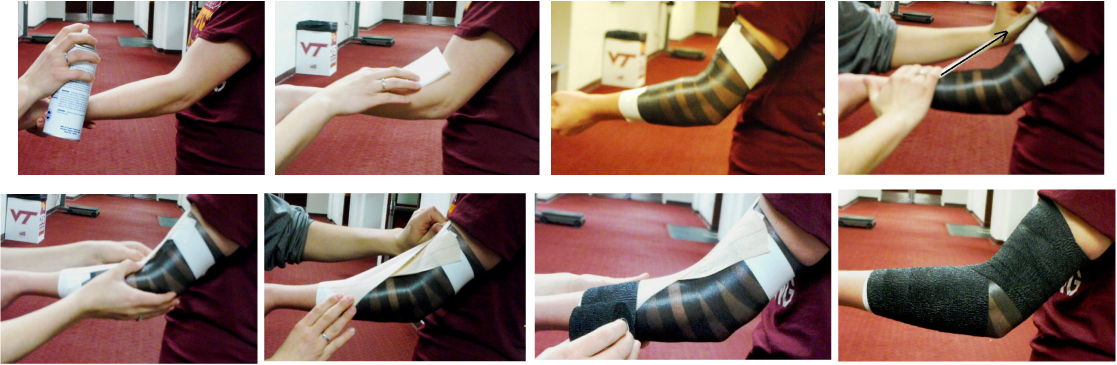
- Place the athlete in the proper positioning.
- Unless the athlete states otherwise, spray the entire forearm, elbow, and just below the base of the bicep. Then apply one of the heel and lace pads to the area of the cubital fossa (the anterior aspect of the elbow joint).
- Apply pre-wrap to the arm, making sure to cover the middle of the forearm all the way to the middle of the bicep, moving distal to proximal, overlapping by half, making sure there are no wrinkles or gaps.
- Next, using the 1.5 inch white athletic tape, apply two anchor strips at the middle and base of the bicep, as well as the middle of the forearm. This anchors should be anchored at an angle in order to conform to the contours of the arm.
- Using the 2 inch Elastikon tape, anchor the tape on the on the lateral side of the bicep anchor. Using moderate roll tension, pull the Elastikon distally towards the medial side of the forearm anchor. The tape should cross over the center of the cubital fossa.
- Apply the second Elastikon strip to the medial side of the bicep anchor. Using moderate roll tension, pull the Elastikon distally towards the lateral side of the forearm anchor. The tape should again, cross over the center of the cubital fossa.
- Apply the last Elastikon strip to the middle anterior aspect of the bicep anchor. Pull the tap distally towards the center of the forearm anchor. This strip should cover the cubital fossa.
- You may anchor the ends of the Elastikon by loosely applying the 1.5 inch white athletic tape as an anchor, covering the ends of the Elastikon.
- Using the 2 inch Power Flex, start at the forearm anchor, moving in a circular motion, move in a proximal direction, overlapping by half. Make sure to cover all of the tape, but leave the posterior aspect of the elbow open. End the Power Flex closure strip on the bicep anchor.
- Once completed, ask the athlete how the tape feels, making sure that it is not too tight and is not causing friction in any location.
Demonstration:
http://youtu.be/YtT4wQ-8ZGA
http://youtu.be/YtT4wQ-8ZGA
